
This tutorial provides an introductory overview of the Nodey UI, along with key shortcuts to help you quickly become familiar with the platform.
Below are a few essential terms and their definitions to help you better understand the interface and functionality.
-
Nodes: An individual point or entity. Additional definitions for each node can be found here: Nodes Glossary .
-
Graphs: A collection of points and their connections.
-
Subgraphs: A smaller portion of a larger graph.
With those definitions in mind, let’s deep-dive into the basics of Nodey.
Exploring the UI
Nodey’s UI includes a variety of icons within the viewport. Let’s break down what each of them represents and how they are used.
Icons and Buttons
|
|
Show Node Library and Extended Menu |
|
|
Run Graph |
|
|
Save Graph |
|
|
Load Graph |
|
|
Clear Graph |
|
|
Prompt Graph Creation |
|
|
Run Subgraph |
|
|
Delete Node |
|
|
Collapse Node |
Basic Interactions & Shortcuts
Now that the viewport is no longer uncharted digital space, let’s walk through a few basic interactions and shortcuts that will facilitate quick and efficient workflow creation.
Basic Interactions
|
Right Click |
Anywhere on the graph to add a new node |
|
Shift Click |
To select multiple nodes |
|
Shift + / or f1 |
To bring up keybinds menu |
|
G |
Group selected frames |
|
Shift + Right Click |
Multiple nodes to align or disable them |
|
Cmd + C |
Copy node |
|
Cmd + V |
Paste node |
|
Drag & Drop |
Users can drag and drop from file viewer into Nodey |
Keybind Menu
|
Navigation |
F |
Fit to Screen |
|
Shift + H |
Reset View / Home |
|
|
Left-click + Drag |
Pan Canvas |
|
|
Middle-click + Drag |
Pan Canvas (Alt) |
|
|
Mouse Wheel |
Zoom In / Out |
|
|
Selection |
Shift + Left-click + Drag |
Additive Box Select |
|
Ctrl + Left-click + Drag |
Subtractive Box Select |
|
|
Shift + Click |
Add to Selection |
|
|
Ctrl + Click |
Remove from Selection |
|
|
Delete / Backspace / X |
Delete Selection |
|
|
G |
Group Nodes |
|
|
Node Creation |
Shift + A |
Open Node Search |
|
Tab |
Context Menu |
|
|
Shift + I |
Create Integer Node |
|
|
Shift + F |
Create Float Node |
|
|
Shift + B |
Create Boolean Node |
|
|
Shift + T |
Create Text Node |
|
|
Search |
Arrow Down |
Move Down |
|
Arrow Up |
Move Up |
|
|
Enter |
Confirm |
|
|
Escape |
Close |
|
|
Editing |
Shift +D |
Toggle Nodes Enabled State |
|
Alt + Drag Port |
Pick Up Connection |
|
|
Alt + Click Port |
Remove Connection |
|
|
Alignment |
Shift + Drag |
Snap to Alignment |
|
Shift + W |
Align Top |
|
|
Alt + Shift + W |
Align Middle |
|
|
Shift + S |
Align Bottom |
|
|
Alt + Shift + A |
Align Left |
|
|
Alt + Shift + S |
Align Center |
|
|
Alt + Shift + D |
Align Right |
|
|
Q |
Straighten Connections |
|
|
Viewers |
Right Click |
Toggle Library |
|
Ctrl + K |
Toggle Chat |
|
|
' |
Toggle Minimap |
|
|
Media Viewer |
Arrow Left / Arrow Right |
Switch Tabs |
|
Ctrl + Arrow Left / Arrow Right |
Switch Outputs |
|
|
Space |
Play / Pause |
|
|
Enter |
Fullscreen |
|
|
Escape |
Minimize / Exit Fullscreen |
|
|
Ctrl + Left Click |
Find Node |
|
|
Paint Tools |
B |
Brush Tool |
|
E |
Eraser Tool |
|
|
W |
Magic Wand |
|
|
G |
Fill / Bucket |
|
|
I |
Eyedropper |
|
|
V |
Select Tool |
|
|
U |
Rectangle Tool |
|
|
Keybinds |
Ctrl + / |
Toggle Keybinds |
|
? |
Toggle Keybinds |
Shortcuts
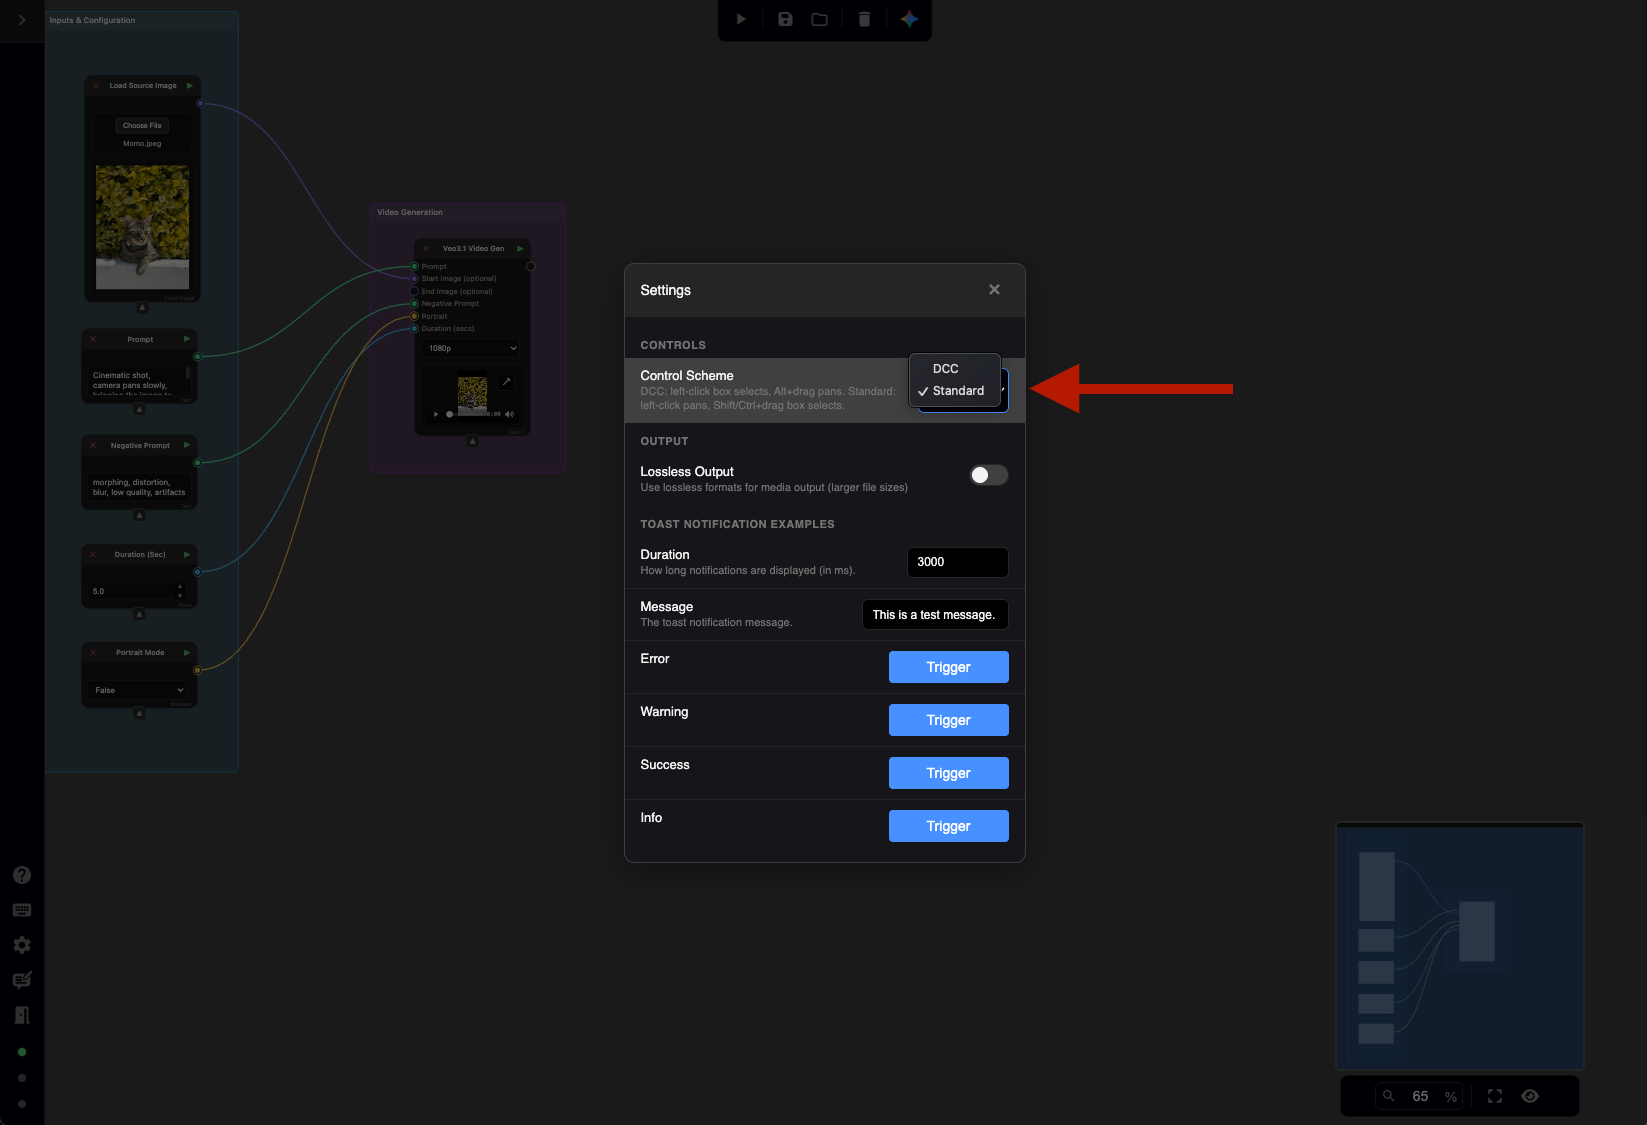
Nodey offers two different control schemes.
-
Standard.
-
DCC.
You can change between controls simply by accessing Settings on the lower-left menu and updating the Control Scheme drop-down between the two options.
DCC Shortcuts Only
|
Left Click + Drag |
Initiates a new selection window |
|
Shift + Left Click + Drag |
Initiated an additive window, adding a windowed selection to the current one |
|
Ctrl + Left Click + Drag |
Subtractive box |
|
Shift + Left Click |
Adds an individual node or frame to the current selection |
|
Middle Click + Drag |
Pans the viewport |
|
Alt/Option + Left Click |
Alternative shortcut to pan the viewport |
Media Drag & Drop
Nodes are extremely easy to create within Nodey. You can instantly generate nodes or entire graph structures by dragging files directly from your OS or browser into the workspace. Here are a few examples for getting started on your workflow.
-
Drag & Drop: Create a node by dragging and dropping media.
-
Copy & Paste: This is also an effective method for creating nodes. Simply use Ctrl/Cmd + C to copy and Ctrl/Cmd + V to paste.
Supported Formats: This workflow works seamlessly with images, videos, audio files, and sequences, automatically creating the appropriate node type for the media you provide.
Note: Graphs will be generated when inserting properly formatted JSON files.
Media Viewer
Nodey features a high-fidelity visual output system engineered for the professional review of multi-modal assets. This integrated viewer supports the seamless inspection of images, videos, audio, and 3D assets generated directly within the graph.
Key features include:
-
Unified Media Interface: A centralized, tabbed UI that allows you to toggle between all 2D media assets without leaving the current view.
-
Node-Specific Image Carousels: Dynamic viewing capabilities for complex nodes (such as "image split"), enabling rapid cycling through multiple outputs within a single interface.
Grouping Nodes - Frames
A spatial organization feature that allows users to cluster related nodes into a labeled, visual container to improve graph legibility and logic management. As graphs grow in complexity, the workspace can become cluttered. Grouping encapsulates specific functional blocks (e.g., all nodes related to Audio Processing or 3D Refinement) into a single colored area.
-
Group Creation: Quickly encapsulate a selection of multiple nodes by pressing the G shortcut, generating a container frame for improved workspace organization.
-
Contextual Framing Options: Right-clicking a frame provides access to management tools, including:
-
Ungrouping: Dissolves the frame while maintaining the current layout and integrity of the underlying nodes.
-
Visual Customization: Supports the assignment of custom color profiles to frames, enabling clear visual hierarchy and rapid identification within the graph.
-
Align & Collapse Nodes
A set of layout tools designed to streamline graph organization by standardizing node positions and reducing visual footprint.
-
Collapse Nodes: Use the small arrow button at the bottom of any node to shrink its size. This clears up space without removing the node from your workflow.
-
Align Nodes: You can quickly line up your work by Shift + Clicking multiple nodes. This allows you to snap them into a clean, organized layout.
Tip: Check the Keybind Menu for specific alignment shortcuts.
Graph Append
This function allows you to import or load another graph into the current viewport, placing it alongside the existing graph rather than overwriting it. The flow for the graph append node prompts users with three options: Replace, Append, or Cancel.
-
Replace: Loads the new graph and frames it within the viewport.
-
Append: Overlays the new graph, allowing you to freely position it anywhere within the viewport.
-
Cancel: Stops the graph from loading into the viewport.
Disabling Nodes & Wires
A workflow management feature that allows users to temporarily deactivate specific nodes or connections, stopping data flow and computation without deleting the logic from the graph.
-
Disabling/Enabling: Users can right-click on nodes or connections to disable and re-enable them.
-
Inserting Nodes: The right-click menu on a connection can accommodate the disable connection feature. Clicking this option will insert a node and show choices for which nodes to insert.
These are some of the in-app basic interactions for Nodey. For further guidance on using the platform to create content, please refer to the step-by-step tutorial in the next section.
Add a comment